
Table of Contents
Welcome to ScanChex® World?
Examples of how ScanChex might be utilized includes:
- Companies in any industry could use ScanChex to manage the prescribed servicing and routine inspection & maintenance of their critical assets that, if not carried out on a timely basis, could jeopardize the viability of their ongoing operations, such as Hotels, Attractions, Security Companies, Manufacturers and Municipalities. For example:
- When last was the generator checked, and by whom?
- Was the store opened up on time for business?
- Did the restocking clerk miss one of the vending machines?
- Were all four sides of a vacant house checked or just the front?
- Were my pets fed on time while I was away on vacation?
- Service maintenance companies could monitor their field technicians, helping to ensure that they are showing up for appointments on a timely basis, and alerting both management and their customers of any potential delays via emails or text messaging, helping to protect and enhance the company’s reputation tardy in carrying it out, and because each tag is geo-coded it must be scanned from the pre-established location.
- ScanChex is a perfect solution to help healthcare providers ensure that patient visits are scheduled and maintained on a timely basis, providing independent verification to satisfy compliance protocols for all levels of care, mitigating audits for improper questionable practices.
- Construction companies could use ScanChex to help confirm that their critical staff and sub-contractors are reporting to various job sites when they should
- In Agribusiness, where management can receive independent verification that critical operations are being carried out by all levels of staff on a timely basis, thus enhancing productivity.
ScanChex® simply lets you know when an assigned individual has not shown up to do their prescribed task or is
ScanChex goes further, in that:
- Before they leave your facility, you can be sure that your employees will be fully equipped to service the customer with all the parts &/or other components that they’ll need to properly carry out their assigned tasks
- Clear and easy to follow driving directions are implemented helping to save time and money
- Your employee will have at his or her disposal full documentation available such as schematics, help guides, technical references and the like to help save time and money as well as to deliver the kind of top-notch service that you would want
- Multiple detail written & voice notes, in addition to photographs and videos may fully documented on each ticket
- Customer sign-off and payments can be taken by your employee, helping to reduce accounts receivable
- As your employee wraps up their current job, an email notification can automatically be sent to the next customer along with your employees ID so they’ll know who to expect
ScanChex also provides a variety of management reports ranging from missed scan notifications, packing slips, employee schedules to employee speeding advisories, just to name a few.
ScanChex is a subscription, cloud based ‘Software as a Service’ which means that there is no software to download, and you can access the platform anywhere there is an internet connection.
Additionally, ScanChex is designed to be up and running in a matter of minutes without the need for specialized equipment and utilizes everyday smart phones as the scanning device.
ScanChex allows you to use our service in 6 broad categories:
- Asset Inspections
- Personnel Monitoring
- Check Out – Check In
- Service, Maintenance and Repair industry
- Healthcare industry
- The pet care industry
After three years in development, and having employed the highest standards of programming and security, you can be assured that our services are constantly being improved as the company rolls out new features and improvements, always staying on the cutting edge of the latest technological advances.
ScanChex, Inc is based in Miami, Florida, United States.
System Requirements
System Requirements
- Any computer with an internet connection
- A printer for reports if desired
- A smart phone
Following are the System Requirements for each platform:
I-Phone:
In order to take full advantage of the features of the iPhone, we recommend that the latest version (7.0 or above) be installed. Some of these features are:
- constantly updating the location of the employees and clients and
- show the direction with interactive maps,
- push notification messaging
Any versions lower than 7.0 might have some errors in the GPRS mapping system.
Android:
In order to take full advantage of the features of an Android device, we recommend that the latest version (7.0 or above) be installed. Some of these features are:
- constantly updating the location of the employees and clients and
- show the direction with interactive maps,
- push notification messaging
Any versions lower than 7.0 might have some errors in the GPRS mapping system.
A working example of how ScanChex is used
Company: US Property & Maintenance Services, Inc
Type of business:
- Provides inspection services for banks and others to ensure that empty foreclosed homes are not being occupied or otherwise being vandalized.
- Repair and maintenance services are also offered to a customer base, for which the company has specialized employees based on the type of services required (for example: electrical, plumbing, HVAC)
- They operate in all major cities within the US, and is actually thinking of branching out overseas
- Currently they service over 2,000 properties
- Have 350 field employees, inclusive of supervisors
Requirements:
- Management needs to be able to schedule the employees & know their whereabouts at any given time
- The ability to create simple work order tickets, track the progress through the day and for the employees to document any particular issue as they need
- Be alerted when employees are late to a job site. Their customers too would like to be alerted of missed / late visits
- Because of liability concerns, US Property needs to have a system to ensure that the right employee has been on the job
An overview of the steps required to set up your account and get started:
15 Days Trial
Register:
To avail the services of ScanChex, every customer is required to register, and we do offer a FREE 15 Days trial account to explore our services – this time period will help ensure that ScanChex is right for your business and your assigned account executive will help you configure and implement a proper trial along with goals within a limited area of your operation (please see our suggested Trial Period Guidelines which will help you during this time.
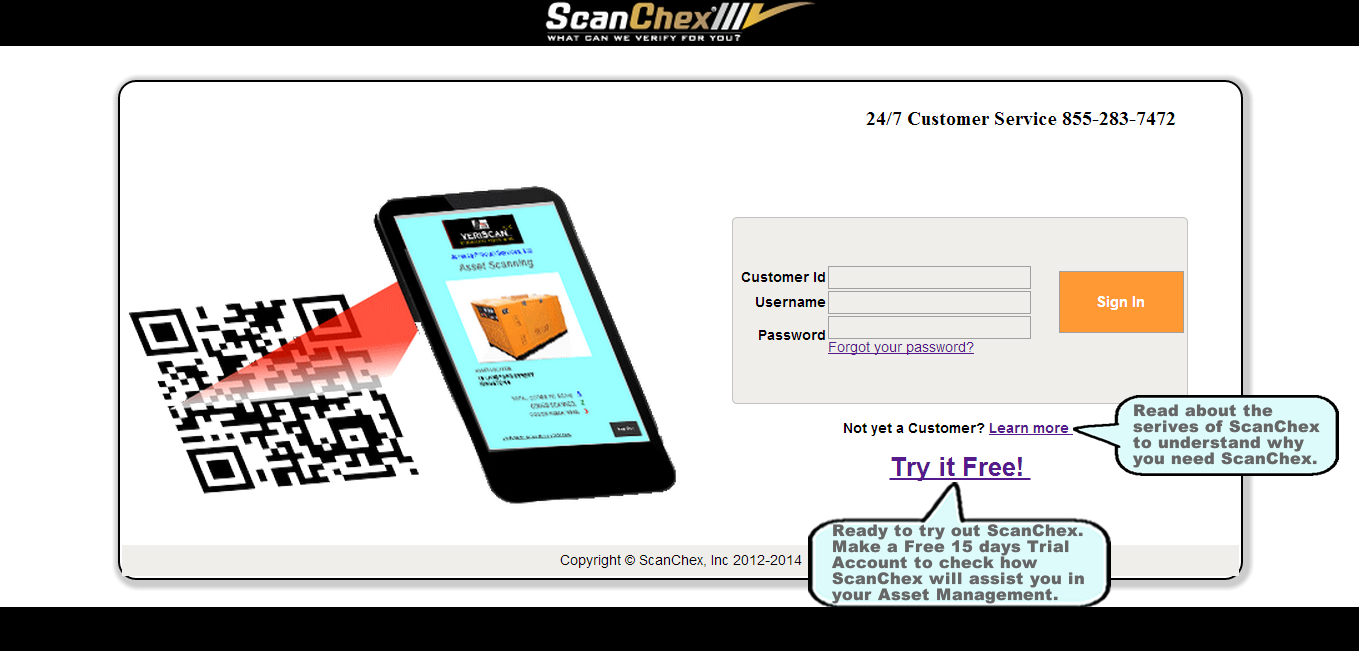
Click on the “Learn more” link to view a briefly video explaining what ScanChex is all about. Already explored the options? Click on the “TRY it FREE!” link to sign up today and enjoy 15 days free of charge.
Create an Account
Create an Account:
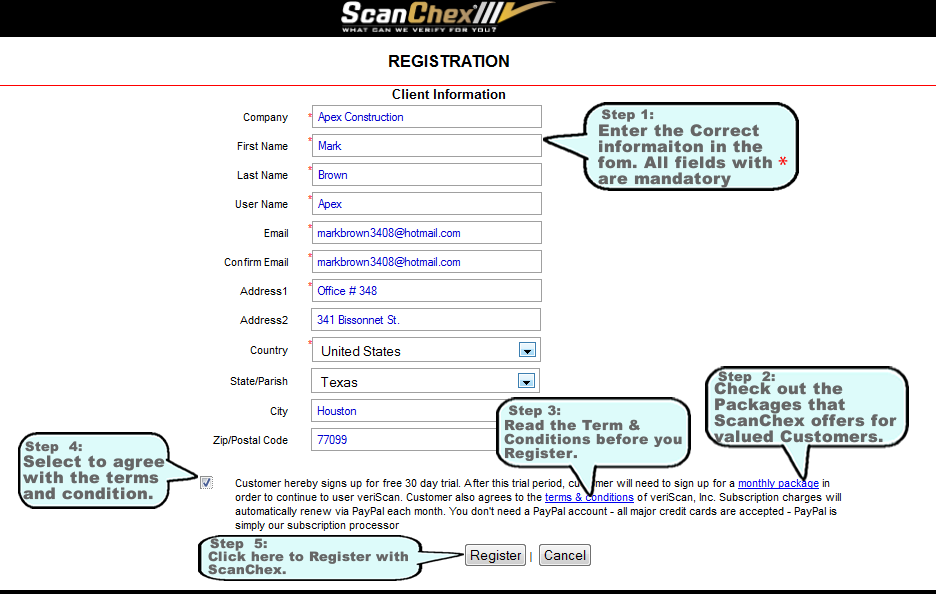
To register for your 15 Days FREE trial Account:
- Complete the registration form with correct information. The email address given should be up-to-date, as the confirmation email will be sent to you there, along with your account number and temporary password (which you will be able to change once you log in).
- All entries with * are mandatory.
- Check out the Monthly Packages that ScanChex offers chose the one that fits your business the best.
- Read the Term and Conditions that apply before you register.
- Select the Check box to agree with the terms and conditions.
- 2,5oo unique property locations
- 25,000 checkpoints
- 25 administrators/managers
- 350 employees/supervisors
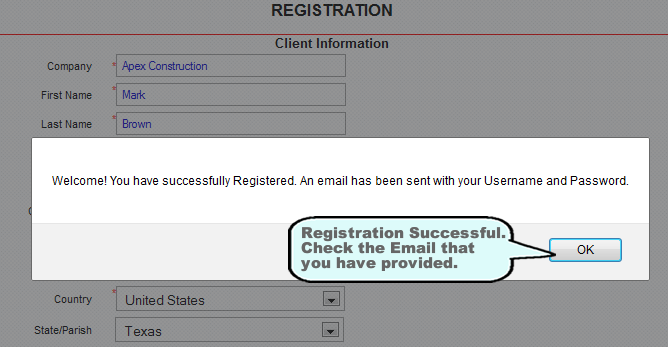
Registration Successful:
Registration is complete. Kindly check the email that you have provided to obtain your account number and for temporary login details.
- You will need to change this temporary password once you log in.
Login Details
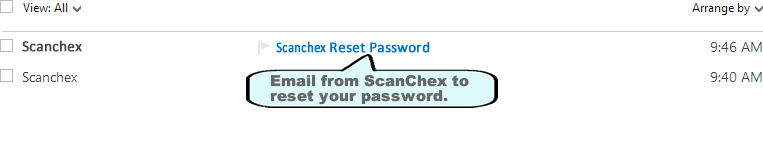
- Check for an email from ScanChex, confirming your Registration.
- Kindly check your Junk Folder and authorize emails from ScanChex to land in your Inbox.
Open the email for your login details.

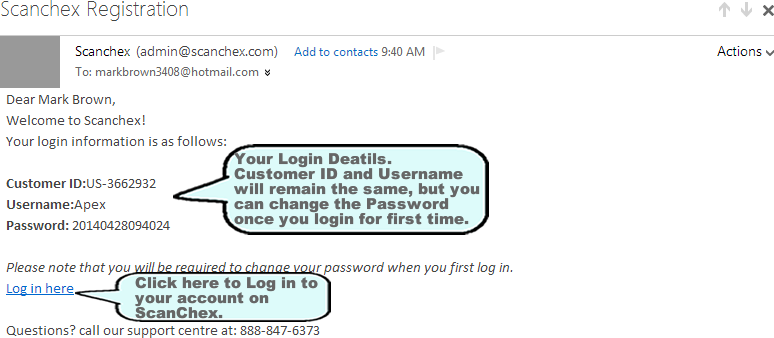
Login Details:
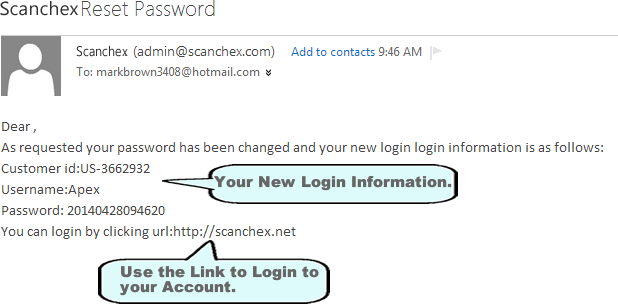
- The email received from ScanChex contains your Login details.
- A unique Customer ID is assigned to you by ScanChex, which both you and your employees will need as part of your login credentials.
- Username is the same as you entered in your registration form.
- Your password is auto-generated by ScanChex. You can change it once you login for the first time.
- Click on the link “Log in here” in your email. This will redirect to you login page on scanchex.net.
Login
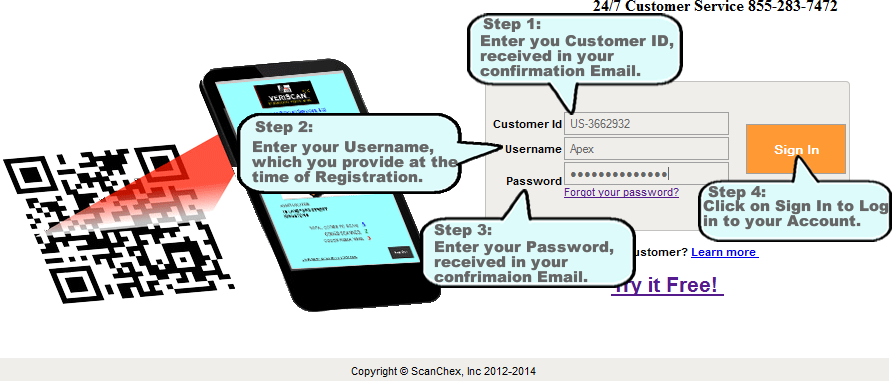
To log in to your Account:
- Type your Customer ID which you received in your confirmation email.
- Type your Username that you have provided at the time of registration.
- Type your Password form the confirmation email.
- Click on Sign In button to Login your Account.
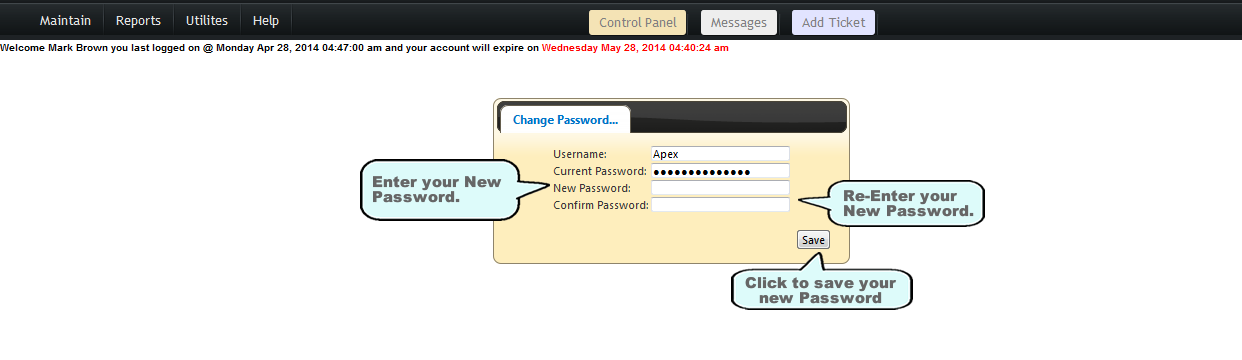
Change Your Password
When you Login for the first time you can change the temporary password which was auto-generated and sent to you in the Registration Confirmation Email. The password should be unique and alphanumeric. And meet the following minimum criteria:
- Be at least 8 characters in length
- Contain at least 1 capitalized character and
- Contain at least 1 numeric or other special character (eg !#@&)
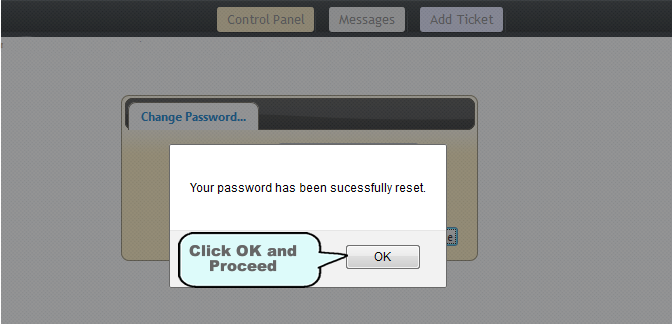
- Your password is changed – write it down carefully and safely so you won’t forget it!
Forgot Password
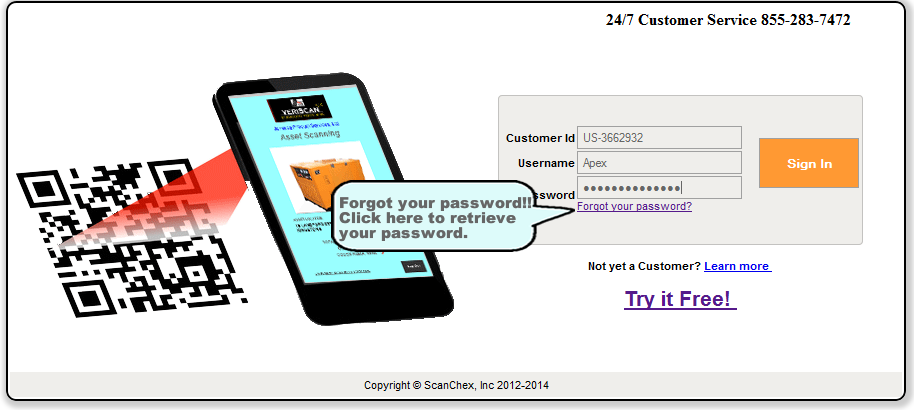
- Click on the on the “Forgot Your Password” Link on your main Login page
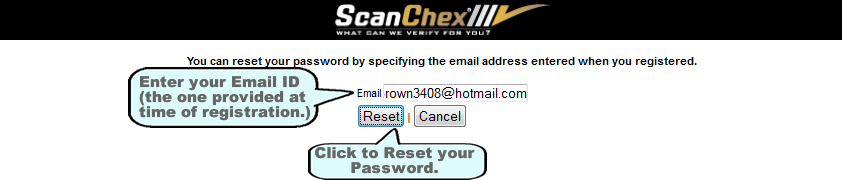
- Enter the email you used to initially create your account
- Check your email for the temporary password sent
- Log in with this password
- You will be asked to change it when you log in

Check your Email for the new Log in details for your account. Use the Customer ID, Username and new temporary password to log in to your ScanChex Account.
You can change your password to your desired one by going to the “Utilities Tab” and click on “Password Change”.
Log Out

Main Features
- Map Panel
- Color coded employee symbols on the map showing current location or last known location if not logged in
- Color coded ticket flags reflecting the status of each ticket (overdue, in progress, completed, etc)
- Various ‘tab’s which become ‘active’ once a ticket has been selected in the ticket panel.
- Calendar Panel:
- Color coded tickets on dates due.
- Simply grab and hold the ticket and move to a new time to change the start time &/or duration
- You can configure the system to send an email to both your customer and employee when any time change has been made as described above
- Click on any date to expand the calendar to more detail
- Ticket Panel:
- Ticket information with detail such as Customer, asset information, start time, employee assigned, status flags
- Can filter tickets by employee, date, status
- Add or edit tickets, assign services etc, inclusive of re-assigning employees
Additionally, there is a “MESSAGES” button at the very top which is where you can send a message to any or all of your employees instantly and from them directly to you. An alert symbol contain the number of unread messages will be show beside it, if this is the case.
The top band also contains the menu items in addition to the other short cut buttons: CONTROL PANEL, MESSAGES, TICKETS, LOG OUT. Your name and current time (at your logged in location) is also shown.
Header Image
Finally, just below the menu, you will see a message indicating:
- When you last logged in (as a security feature)
- When your current subscription expires
You can manage your View / Edit / Print your QR codes, Reports and Employees performance.
You can upload the Requirements, Questions, Documentations, Videos and audios that are required for your employees to carry out the efficient work in minimum amount of time.
The Website interface will give you full command over all your business modules, including to ability to send messages to any or all of your employees instantly and update their work priorities.
Here a glance of the main control panel of your ScanChex Account.
Complete Control Panel image
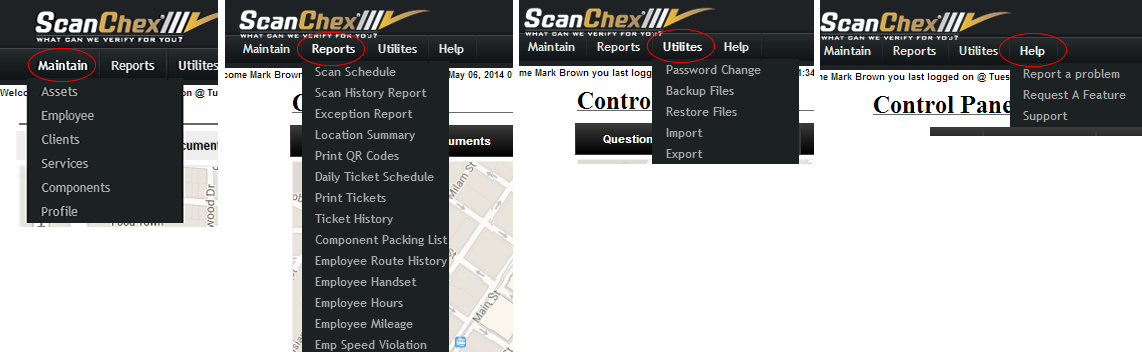
Main Menu
The main menu contains four tabs, “Maintain”, “Reports”, “Utilities” and “Help”. These tabs have menu items grouped according to the type of functionality and which will give you easy access to the specific action you wish to carry out:
- Maintain contains functionality to create and manage your Assets, Customers, Employees etc, in addition to your Profile settings– these are your default settings
- Reports provides you will all the reports necessary for keeping track and records of your business.
- Utilities provides you with backup & restore, import and export utilities.
- Help provides access to this Help Guide in addition to how to get support as well as a place where you can report issues and even request feature you think would be beneficial to all users.
Populate Your Account
As stated before, the very first time you log in, there are a few things that you will need to do, to set up your account properly:
- Complete your profile
- Add at least one employee
- Add At least 1 customer
- Add at least one asset
In fact, in keeping with the above, the system will guide you through these steps,the first time of you log in (after you have changed your password from the temporary one).
The screenshot below shows the employee panel containing your own information. A server message is displayed on the top of the panel reminding you that you need to add at least one employee. Note that your information is already added for you here as the “Administrator”, shown as “Admin” under the “Level” column.
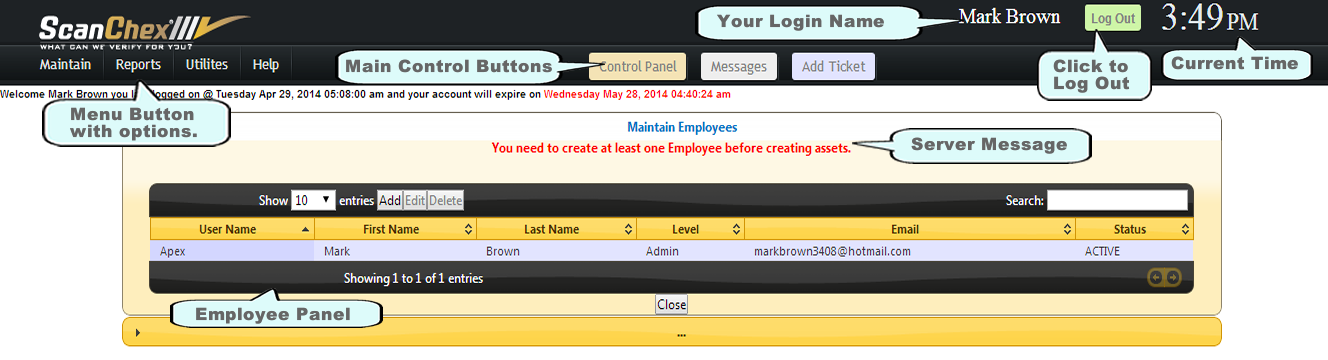
The Main Control tabs are always on the top of every screen:
- The “Control Panel”tab will guide you to your Control panel where you can see all the current activities, add and assign tickets, etc.
- The “Message” tab will open you chat panel where you can send messages to any or all of the employees. These messages will be shown as push massages on their devices. Any unread messages (and number)will be indicated by a red circle
- The “Add Ticket” tab allows you to add tickets any time you want.
These will be described in greater detail later in this guide.
Finally, on the top right of the side, the current time according to your time zone is displayed.
Overview
In updating your profile, you will upload your logos, default settings, create and maintain your documents library, default questions for your employees, and many more. Updating is very important as you information will reflect on your statements, reports, employee cards etc.
Here is a step by step guide to update your Profile settings.
Complete your Profile

Edit or Update your contact information. This information will be displayed on your statements, reports and employee ID cards. The Account Summary will show you the package that you are presently subscribed to, along with the maximum capacities allowed within the package as well as show how many of each you are currently using and how many you have left. These include:
- Number of unique assets allowed
- Number of checkpoints
- Number of Administrators
- Number of Customers
- Number of Locations
- Number of Employees
Profile Page image
2. You can upgrade your monthly package by clicking on the upgrade link and select the package best suited for your business. You can subscribe for your monthly package instantly. See the Monthly package payment option for more details.
server message image
packages image
3. Assets added to your account are summarized and compared against the package you have subscribed for, leaving the amount available– show in a separate line.
Account summary image
4. You can also cancel your account when you click on the cancel link on your profile page. Confirm your selection if you are sure you want to cancel your account permanently.
Confirm page image
Add Questions
QUESTIONS allow you to create a series of default questions which may be common to the assets that you create and which can then be selected from, as you create these assets.
For example:
You may want every asset to contain the following questions on each ticket:
- Was the site left clean
- Was there any sign of tampering
- Was there any sign of tampering
- What was the patients temperature & pressure
Questions may be in any one of three forms:
- Simply “Yes/No”
- Multiple Choice
- Written extended answers
Once you enter these ‘default’ questions within your profile, you may then select from among them when you create your assets.
In this way, any ticket created for this asset, will now have these questions WHICH MUST BE ANSWERED BY THE EMPLOYEE BEFORE HE/SHE WILL BE ALLOWED TO CLOSE THE TICKET OUT.
Please note that you do have the ability to create “Custom” questions at the asset level, specific to the asset (in addition to the ‘default’ questions).
6. Click on Add button to start adding your Questions into to your profile.
Click Question Image
7. Write the Questions in the Question section and choose the type of answer for the question that your employee has to submit.
add Question Image
8. There are 3 types of answer choices available.
- Yes / No- the answer of the question will be either yes or no
- Multiple Choices- you can add multiple answer to the questions from which the employee must choose
- Written Answer-your employee will right the full detail for the questions
9. Save the answer of the questions.
Save Questions Image
10. You can update these questions and their answers any time you want by clicking on Update button in the end of each question. You can also add more questions.
Question Update Image
Add Documents
- Schematic and technical drawings
- Help and installation guides
- Company policy guidelines
- Reference codes and the like
Please note that you do have the ability to create “Custom” documents at the asset level, specific to the asset (in addition to the ‘default’ documents).
Add documents image
13. Select the Document you want to upload by clicking on the Choose File button. Navigate to where the file is located on your computer and then click upload to upload the document.
- .DOC
- .XLS
Choose file image
14. The documents will appear in your Document panel where you can Edit or delete them.
Type doc image
Profile Settings
15. The last step in the set up process is set some additional default information as follows
- Prefix Ticket ID
- Inspection and Travel Time
- Set your Date format for your system
- Your own desired Encryption Key used to encrypt your data
- Default cancellation Reasons
- Select whether or not notifications are sent upon Ticket Creation, a ticket being rescheduled or when the employee is on his way.
- Enter the email of your company officials who will receive the alert notifications on various ticket statuses.
- Upload your Company Screen and Reports Logo, Employee Card and QR Tag logo as you want them to display on your reports, statements and employee cards – see note below
Setting page image
Let’s look at each of these settings in turn:
PREFIX TICKET ID:
Format YY-999999
Where YY = Year of ticket (set by the system and cannot be changed)
999999 = a number you can enter to conform with your own ticket numbering regime
ScanChex is a ‘ticket’ driven system, and you can use your own initial number when you first start. This number is completely arbitrary and is up to you to decide – what some customers do is to base this on their existing ticket numbers, such as using skipping the current sequence and then starting with the next higher set in round numbers, in such a way as to be able to tell immediately which numbers were generated by ScanChex.
INSPECTION TIME:
This is the ‘default’ time you wish to have on each ticket that you will allows for ‘INSPECTION” type assets to be inspected. For example, if your employee commonly inspects, say empty foreclosed homes, you may wish that this default time be set to 5 minutes per inspection tag or checkpoint.
This is used to help determine the total job time for this particular ticket, and this can be modified from one ticket to the next as needed.
TRAVEL TIME:
This is the average time you wish to allow between one location and the next.
This is used in helping to inform the next customer when your employee may be expected… thus the time from one customer to the next would be computed as follows:
Scan of tag to start job + total of inspection / service times per checkpoint or tag + travel time
DATE FORMAT:
Here you set the date format you prefer:
MM-DD-YYYY = Month-Day-Year
DD-MM-YYYY = Day-Month-Year
All screens, reports etc will reflect this chosen format.. You can freely change any time for your account.
ENCRYPTION KEY:
As part of our commitment to the security of your files, ScanChex allows you to encrypt your data using a key only known to you, and this is where you can create this key.
Please keep in a safe place.
DEFAULT (TICKET) CANCELLATION REASONS:
From time to time it becomes necessary to cancel tickets which have been created. In cancelling these tickets, ScanChex will prompt you to enter a reason and any comments you may wish to add.
The default reasons you may wish to choose from can be entered here for easy application.
CUSTOMERS NOTIFICATIONS:
There are three default notifications which you may set:
- Ticket Creation
– when set to YES will send an email to anyone listed in the DEFAULT EMAILS (See below)
- Ticket Reschedule
– if there is a change to a tickets scheduled time, then a notification will be sent, not only to the assigned employee, but also the customer, and anyone listed in DEFAULT EMAILS
- Employee On His Way
– when set, will alert the customer that the employee is on his way, or running late
– additionally, the Employee’s ID card is sent to the customer so as to be alerted whom to expect from your Company
DEFAULT EMAILS:
There are 5 default emails available to be alerted to the various messages being sent from time to time. Additionally each can be individually selected to receive “Alert on Exception” or “On Scan”.
Alert on Exceptions
This recipient will get an alert email whenever there is any kind of alert message sent eg an employee not scanning a code on time
Alert on Scan
This recipient will get an email when a tag has been scanned
COMPANY LOGO:
ScanChex allows any account of at least 100QR to have their own “private label” logo appearing on the Control Panel and Main Screens.. Think of this as a way of white labeling, so that your company’s logo will appear instead of the ScanChex logo
If used, this logo needs to be a maximum of 225 x 35 pixels as shown, for best fitting.
ID CARD LOGO:
Please enter the company logo here that will print out on you employee’s ID cards.
For best results, use a size of 385 x 215 pixels.
QR TAG LOGO:
Once again, if your account package is greater at least a 100QR or greater, you will have the ability of including a private label logo within each QR tag as they are printed to enhance your company’s brand.
For best results, use a size of 50 x 50 pixels. If your account allows it, and if used, you will see a sample tag generated to help you refine the tags label and also to make sure that it scans OK.
Click Save to save the changes you made in to profile settings.
Overview
Some of the features include:
- Preview ticket information and work to be done
- Use the mapping feature to get driving directions
- Send / receive messages from the Administrator
- Access a full library of documentation such as schematics
- Make written & voice notes, in addition to videos & images
- Review prior ticket history
Following is a step by step guide to demonstrate how to add and modify an employee.
Add Employee
Open Employee image
Or if the window is already being displayed, click on the Add button to start adding your company Employees.
Add employee image
Employee Information
information employee image
3. Choose the level of your Employee. There are currently three levels:
a. Manager
b. Supervisor
c. Employee
The Manager level employees have full access to the entire scanchex.net ‘back-end’ to administer the system and perform any function such as adding tickets, customers, assets run reports etc.
Managers and Supervisor level employees have access to a special administration panel of the mobile application where they can perform certain functions such as the ability to take new asset pictures and pin-point its physical location more accurately.
The Employee Level represents your mobile workforce., responsible for actually doing the work as contained on each ticket.
4. Choose the status of your Employee.
a. Active
b. Inactive
Active employee image
If the employee is available to work set this to Active.
If an employee is not working with your company in this position again, set this status to Inactive.
- Employees cannot be deleted as such, they can only be de-activated.
- This is to ensure that we can still report on the activities of these in the various historical reports that are available
- Any tickets which had been previously assigned to an employee, who is now to be made Inactive, will upon doing so, be put into “Un-assigned” status and will need to be reassigned to another employee
- Employees can be reinstated at any time
Warning message image
5. Enter the Username and Password for the Employee. This Username and Password will be used by the employee to login to their devices to carry out their assigned tasks.
Username Employee Image
6. The Username and the Email of all Employees should be unique as the system will verify if either Username or Email ID of any employee matches with any others, within your organization.
Waring message username image
7. Upload the Picture of the Employee. The picture option is used for making the Employee Cards for their verification purposes, and for the best resolution you should make the size 300×300 pixels / dpi.
upload image
8. Click on “Save and Add New” button on the bottom of the page to add a new Employee of your company.
Information saved images
Edit Employee
Employee panel image
10. To Edit / Update and Employee, simply double click on the name of the employee you wished to update and or click on “Edit” button on top of the panel, after selecting the employee first.
Edit Employee image
11. Update the information of your employee. The username and password can also be updated. Click save when you finish updating the current employee.
Update employee image
Print ID Cards
print id button image
13. A separate window will open with the Employee card. The Employee card will show Employee’s Name, Designation, Picture, Your Address and a QR Code. This QR code is unique to this particular employee and allows him or her to scan in in cases where:
- The customer is going to a new customer who may not have an QR tag on the asset
- There is a QR tag but it has been damaged in some way, and is not adequately scan-able.
There is also an area for you to add your company’s logo which is needed for your employees ID card.For the best resolution this image needs to be.
This is added under your company’s profile.
ID card image
- The ScanChex logo appears on the ID card for accounts under 100 codes. Any account over this is able to add another logo in substitute (under the Profile settings area).
Delete Employee
Select employee image for delete
15. This will permanently delete your Employee from the system. The system will reconfirm before deleting any employee as to be sure whether the button is clicked by mistake or not.
Delete Confirmation image
- If the employee you are trying to delete or otherwise make inactive, has Tickets assigned to him or her, these tickets will move to be “Un-Assigned” status so you can assign to your other employees.
Overview
ScanChex is ‘customer based’ and you can add as many customers as you want, depending on your monthly package. Your customers may be located anywhere in the world and each will have a designated time zone.
Following is a step by step guide to help you create your customers properly.
Add Customer
1. Open the Maintain tab and click on the Customer link.
Open Client image
2. You will see a summary customer panel, which will list any previously entered customers. To add a new customer, click on Add button on the top of your panel.
Add Client Image
Customer Information
4. You can enter multiple addresses for the same customer. You can enter different managers for each location with their email and telephone numbers. All this information is required for your employee to reach on the specific location and for payment options.
5. The interactive map will pin-point your customer’s location visually.
6. Click Save and Add new to add more customers.
customer Information image
7. The information will be saved in your account. Click OK to add the next customer.
save customer image
8. You can Add you customers later also by clicking the add button on the top of your panel.
Edit Customer
9. If you wish to Edit / Update some specific customer information select the customer from the summary panel and click the Edit button. This will allow you to make changes to that customer’s information. Click save in the end to confirm the changes.
Edit customer image
Delete Customer
Delete customer image
Overview
Services are comprised of components or parts
As shown below the components A .. Z are what comprises Service #123.
Services are placed on your tickets for your employees to perform, and you have the ability to print a packing slip for so that you can be sure the employee takes the correct components (and quantity) to ensure that the work is done efficiently, without back and forth to the office to get the parts needed.
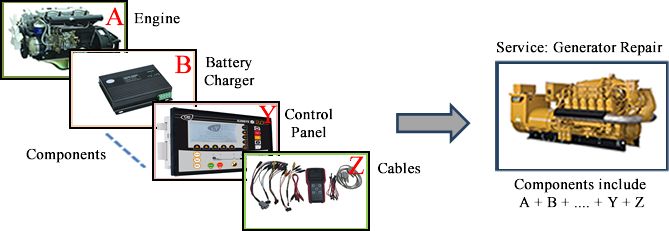
Additionally, you can track your component costs, and also assign a retail value for your customers. As your employee works through a ticket, they check off each service as it is completed, so you are able to keep track of the progress they are making.
You can have as many services as your company needs, and each can be comprised of as many components or parts as required.
This section is intended to guide you through the procedures to set up the components and services needed by your company.
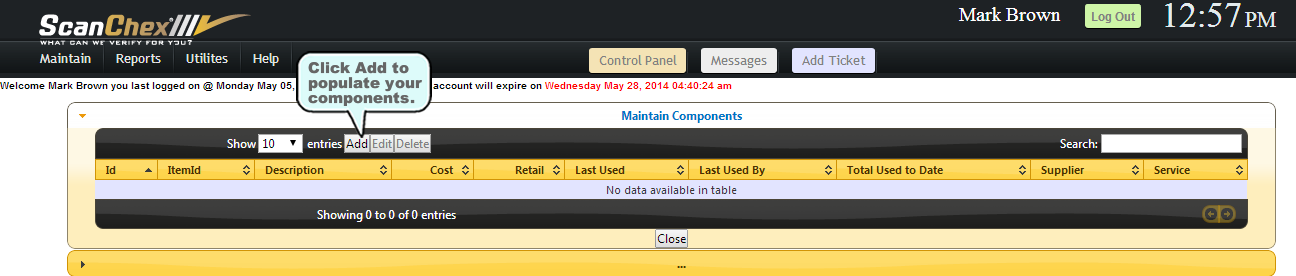
Add Component
To maintain your components (Add, Edit, Delete), simply select “Components” from the Maintain menu.
1. Select the Maintain menu and click on “Components”.

2. You will see the Components Panel. Click on the Add button on the top of the panel to add your first component.
Component Information
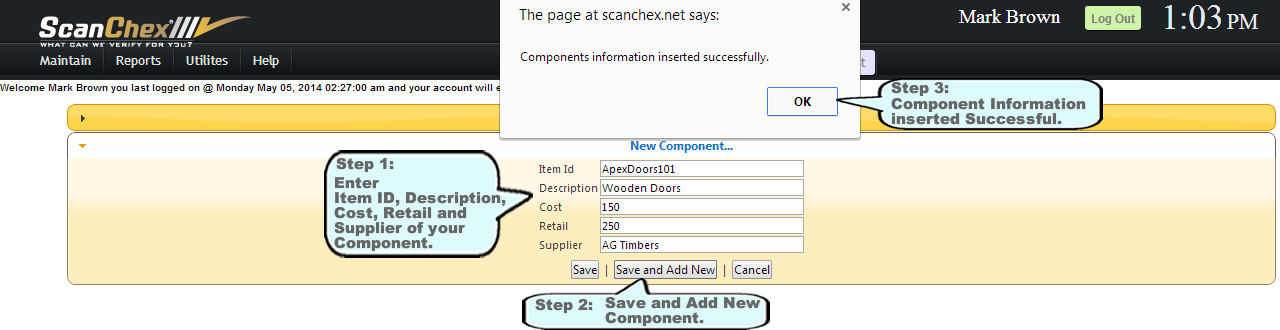
4. After Adding all the information for the component, click Save and Add New to add the next component.
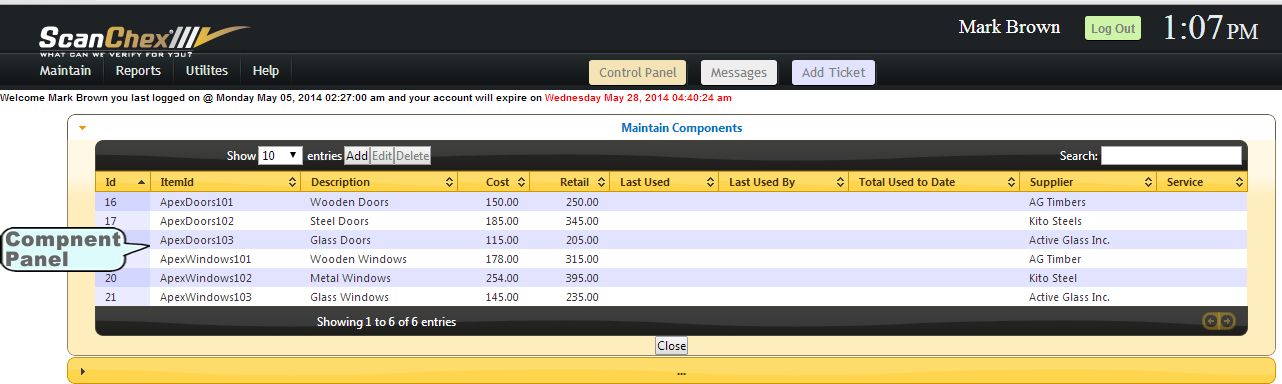
5. After adding all the components, you can see those components in the summary panel with the description of each component.
6. The components panel also stores the information regarding the Last Use, Last use by and total component used to Date. You will find this information useful by helping you to keep track of how many components are used and in how much quantity.
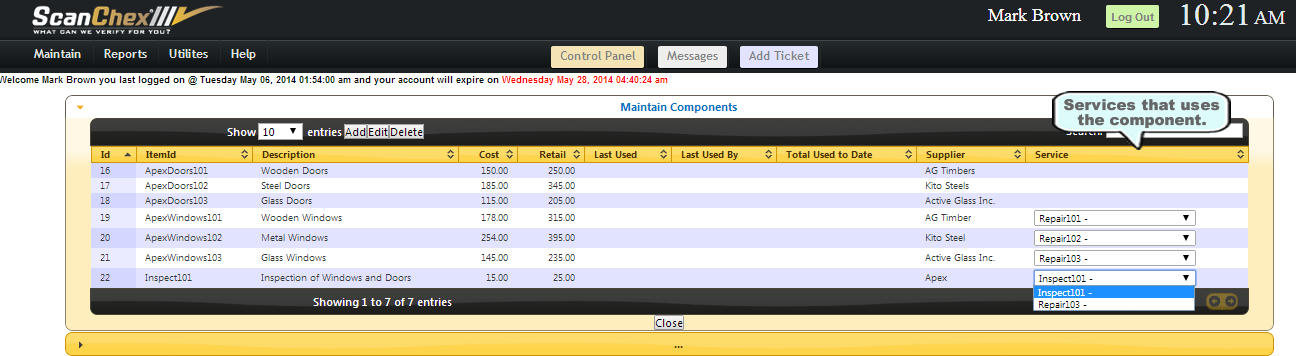
Add Component to Service
Edit Component

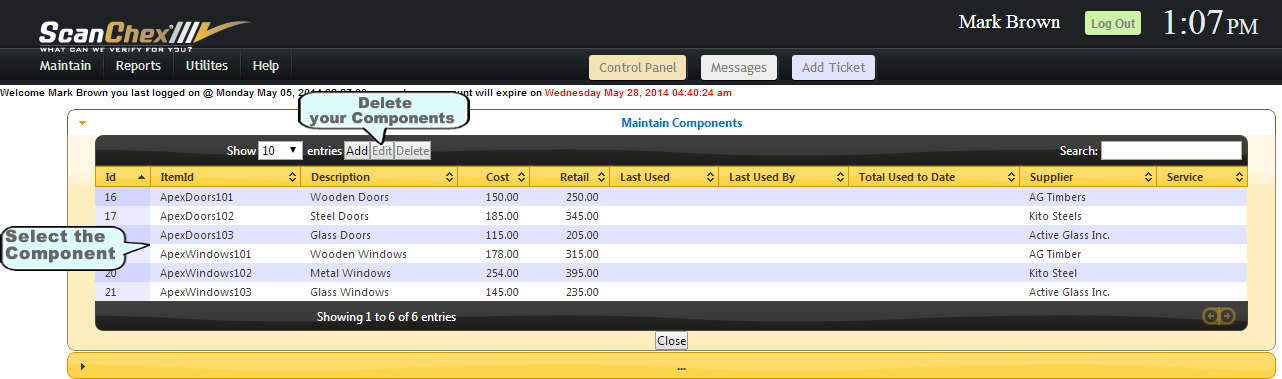
Delete Component
Overview
Here are the steps to populate the Services you need for your organization:
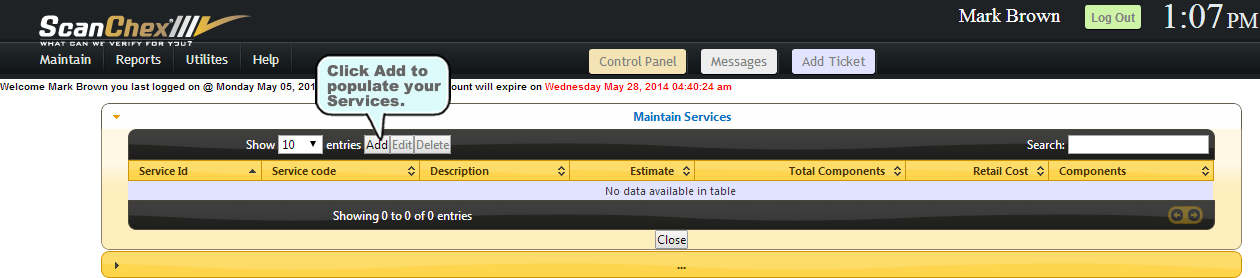
Add Services

2. You will see the summary Service’s panel. Click on Add button to start adding services.
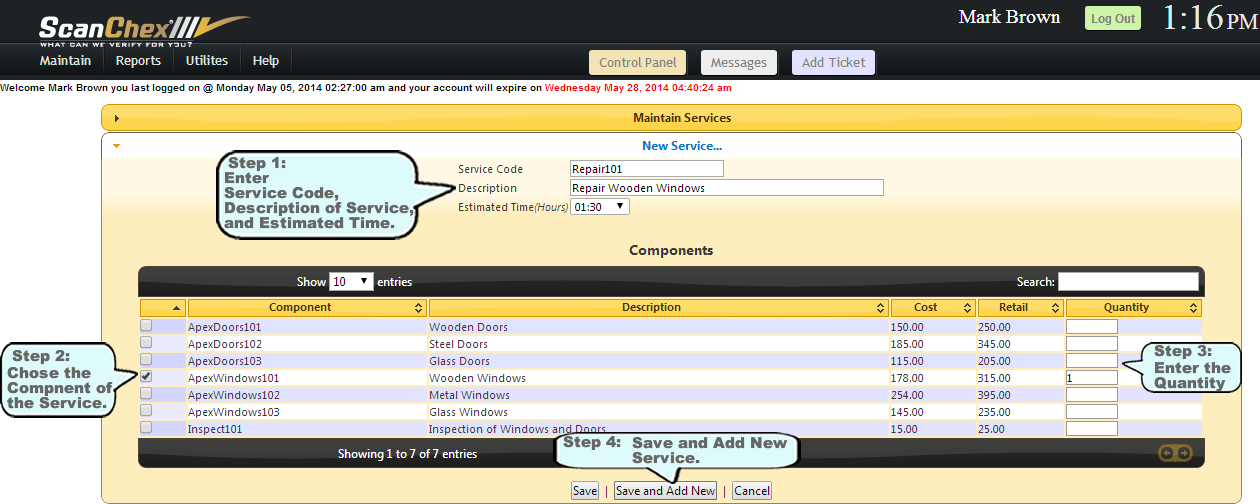
Service Information
- Estimated Time is the average time you expect an average employee to be able to complete this time once they start working.
- ScanChex uses this time to help you total the average time that a specific ticket will take to complete.
- Once your employee starts going over this time, you will be notified,
- and in addition, you can also have the next customer that your employee is scheduled to go to, be automatically notified as well
4. Choose the components that are related to the service.
5. Enter the Quantity of the component.
6. Click Save and Add New Service to add the next service that your company provides.
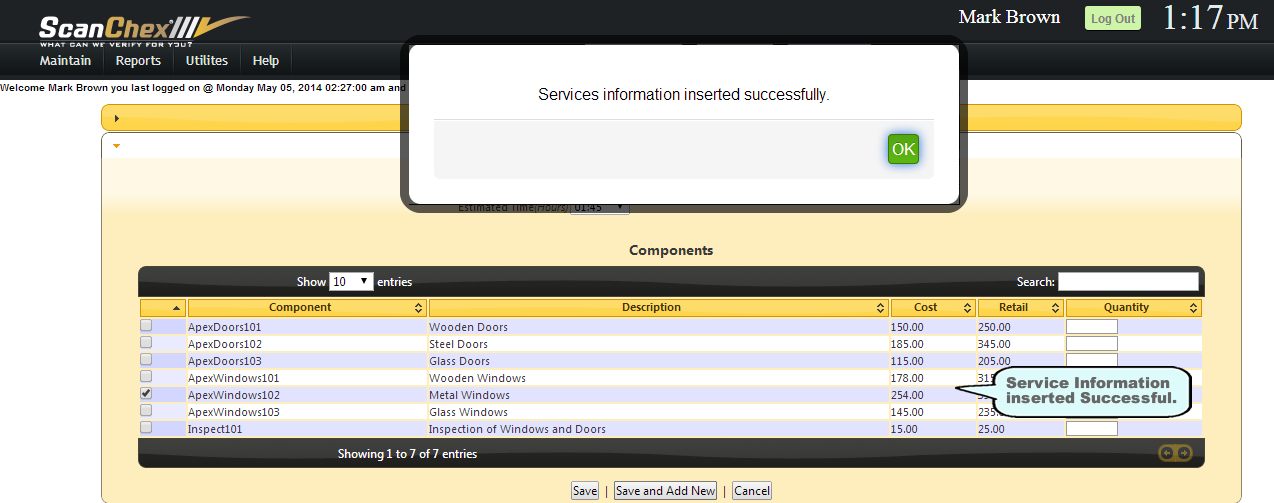
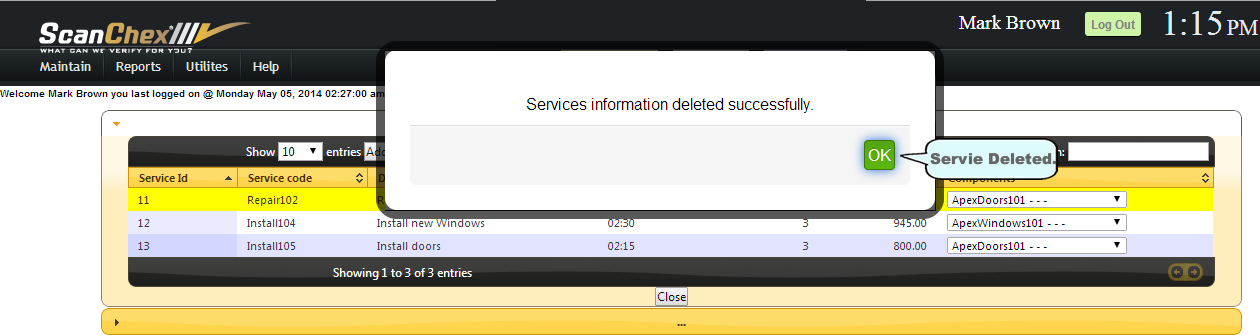
7. The Service is added to your account. Click OK to add the next service.
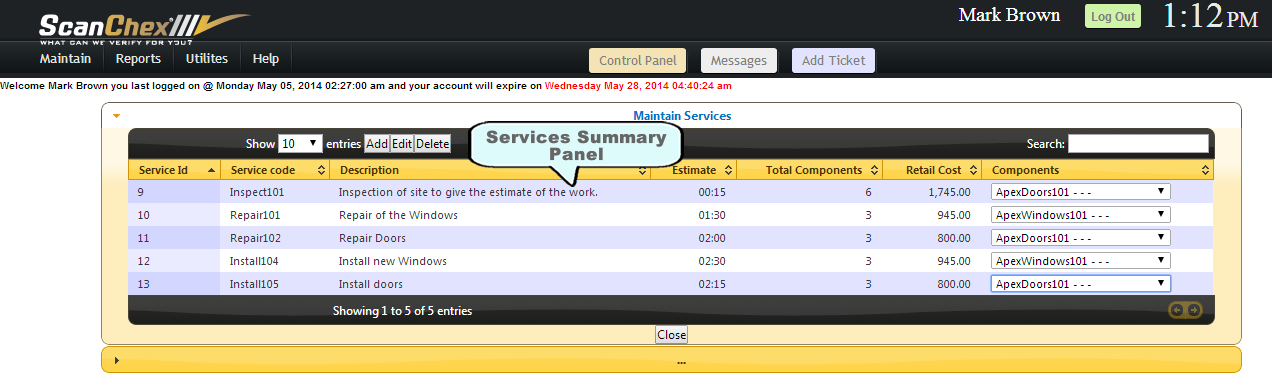
8. Once you finish adding all the services, you can see them populated in the summary Service Panel.
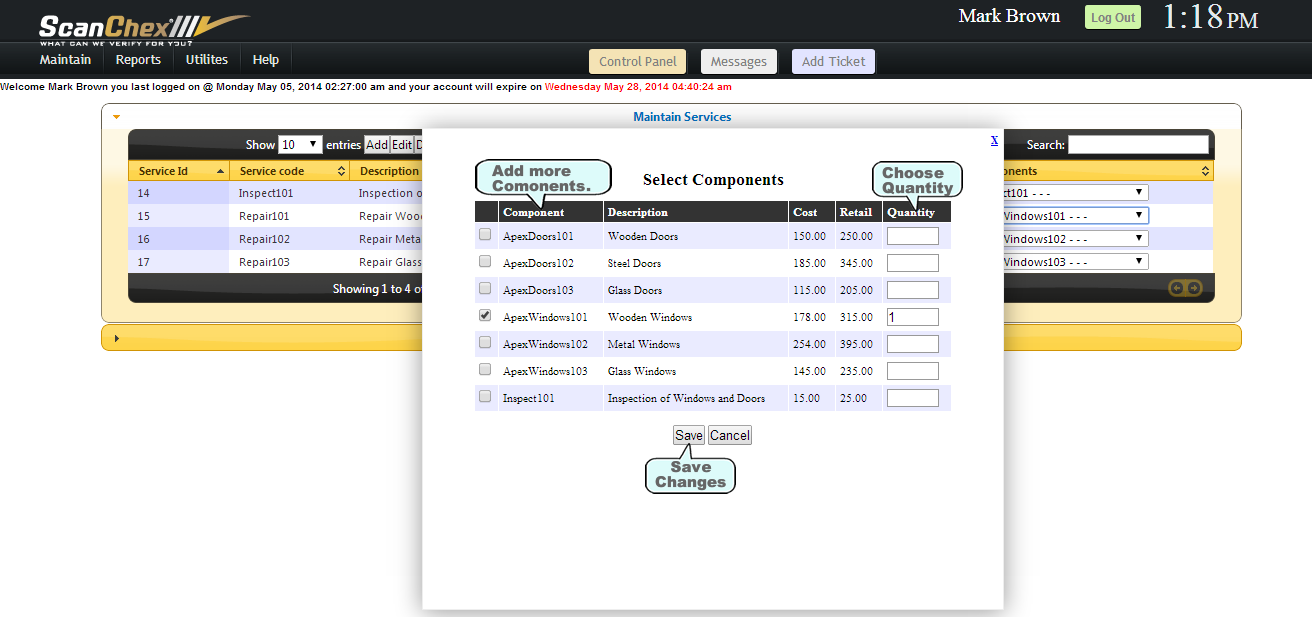
Add Components to Service
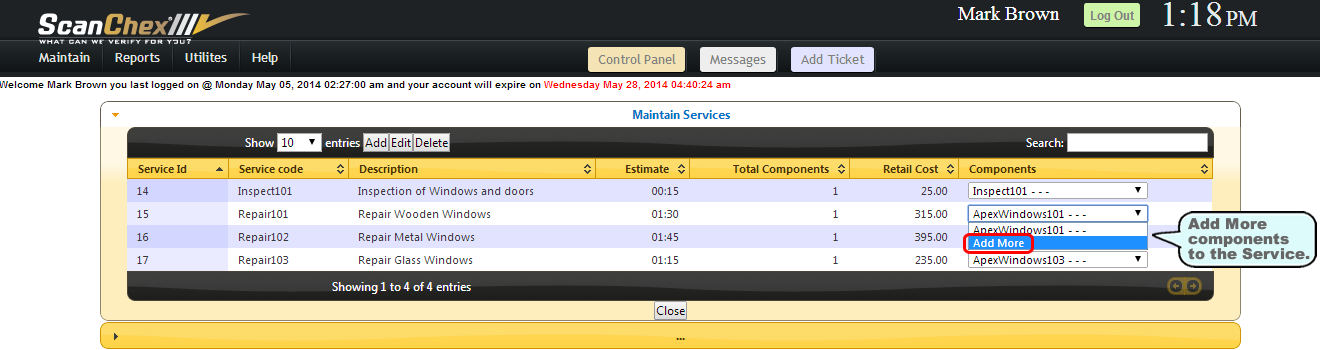
10. By clicking on the Add more you will see the list of components you have already added in your Components section. You can choose the desired components that you need to add to this particular service by clicking the check box. Enter the Quantity of the Components that are required for the service. Click “Save” and the new components are added to your service.
Edit Services
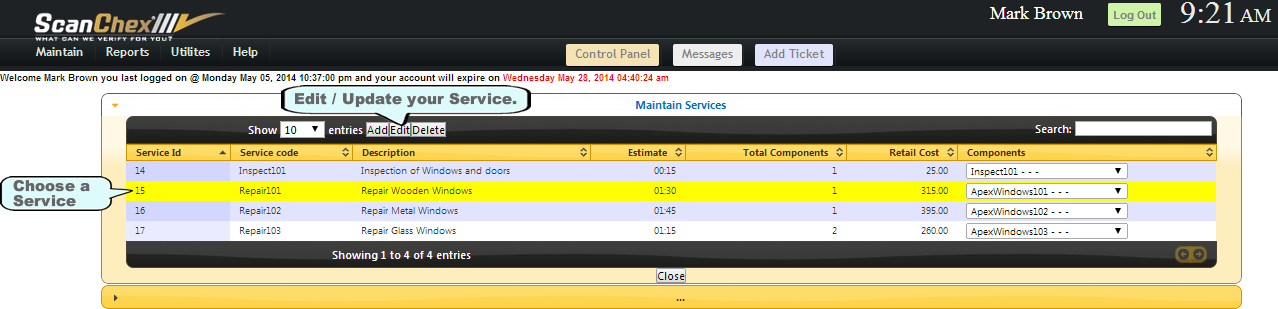
12. After updating the service, click Save to save the changes.

Delete Services
13. You can delete any service you desire at any time you want. If that service is currently used on a ticket, the system will inform you that it is currently active. Select a service that you wish to delete, click the Delete button on the top of your service panel. Confirm your selection to be deleted.
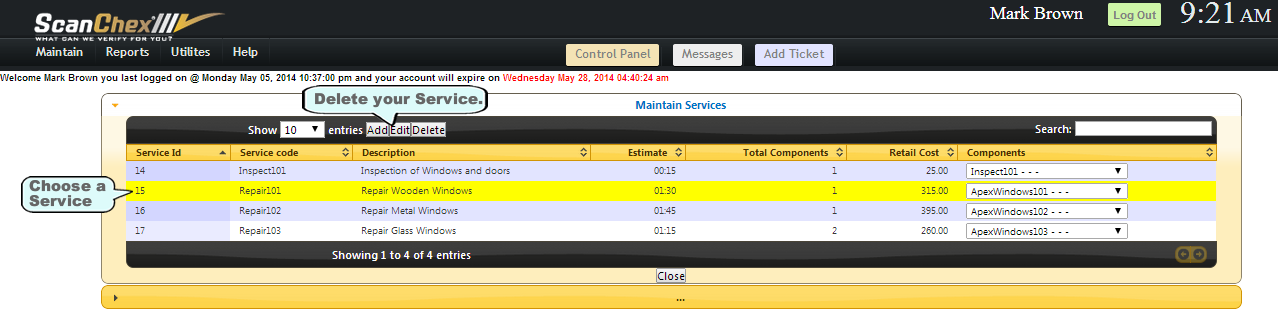
14. Your service is deleted from the system. The components that were a part of the service will be updated automatically.
Overview
- ScanChex uses term to include any item, person or pet.
- The very first field in creating an asset will be to define the type of asset
- These types are as follows:
INSPECTION:
This is used for items which needs to be inspected or checked on some regular basis such as:
- Emergency equipment
- Real estate
- Vending equipment
- Security Checkpoints
- Elevators
- Bridges
In this scenario, an Inspection type asset would be created and assigned a frequency of inspection, ranging from hourly to years. A QR code is printed, which is placed on the asset.
You also have the ability to create a series of ‘checkpoints’ at this particular location, which, when set up will need to be scanned by the employee as part of his duties.
The next step is to assign this job to one of your employees, and using our accompanying mobile app, he or she will scan the code(s) or checkpoints, at the appointed time.
This work appear as ‘tickets’ on the employees device when they log in … these tickets are generated automatically by the ScanChex server several hours on advance of the actual time.
If your employee does not scan the code at the correct time, or location, an alert email is sent to designated individuals. ScanChex is also designed to ensure that the correct employee is doing the work, and there are safeguards to ensure that it cannot be inspected outside a limited window of time.
You will need at least 1 QR tag for each asset or location, however each tag can have at least 5 checkpoints.
SERVICE:
This is used for items which need to be service or maintained, such as:
- Any maintenance and repair company offering their services to outside customers
- For use within your own company
The system works much the same as with Inspections, described above.
Assets are created, but as a ‘SERVICE’ type asset. A QR Tag is created to be placed on the asset, for example and A/c unit in a hotel room.
Employees need not be assigned at the point of creation, and can be done any time the ticket is created. A frequency can be established for preventative maintenance reason to help ensure that the work is being performed when it should.
Additionally, each ticket can have all the services required to be carried out by the employee included so they will know exactly what needs to be done. Before they leave your offices, they can print out the components or parts required to complete the associated service properly.
While they’re on the job, they can fully document the visit by making notes in whatever form they wish such as written, voice, pictures or even videos. They will also have access to any documentation such as schematics or configuration manuals etcand, as well, the prior ticket history and associated notes performed by others.
While the asset is being serviced, the manager can see this progression and any notes recorded, via the Control Panel.
You will need 1 QR tag for each service asset, and this type of asset does not support ‘Checkpoints’
HEALTHCARE:
This works exactly the same as SERVICES described above, however, the ‘assets’ in this case is referred to as ‘Patients’, and is fully HIPPA compliant.
You will need 1 QR tag for each patient, and this type of asset does not support ‘Checkpoints’
PERSONNEL:
This is useful for ensuring that your employees get to work and leave on time. If you do not, then an alert email or text message may be sent to you. An advance calendaring system supports changes in specific days, such as when they’ll be late because of a doctor’s appointment. Holidays are also supported (internal plus public).
You will need 1 QR tag for each employee, and here again, checkpoints are not applicable.
CHECK-IN/CHECK-OUT:
If you have important and valuable equipment that you want to be able to monitor as to which employee has it, for how long, and to be alerted if it is not being returned on time, then utilize our Check-In / Check-Out asset type.
This allows you to assign QR tag to the asset, and then use the mobile app to check it out to a specific employee, for a specific amount of time.
If it’s not returned on time you will be alerted.
You will need 1 QR tag for each asset.
ScanChex PETCHEX
This is being finalized, but will work similarly to the HEALTHCARE asset type, but for ensuring that your pets are being looked after by the correct individual and on time. This service will also support geo-fencing.
This will be launched within the next few months.
ScanChex ENTRÉE
This asset type will be useful in any ticketing operation such as:
Tracking when children are picked up by their school buses. If the child did not catch the bus for any reason, you will be notified instantly.
Or if the elderly is not being picked up on time.
ScanChex ENTRÉE can also be used to check off tickets at a concert to help ensure tickets are not being duplicated fraudulently or in a amusement park to help ensure that the number of rides paid for is not being exceeded.
Text Box Text
Add an Asset
- Open Maintain tab and click on Asset link.Add an image to open asset
- Click on the Add button on the top of your summary asset panel to start populating your Assets.Add Image to add asset
Please note the following:- Company ID, Create Date and Assigned Asset ID are all automatically created.
- Assigned Asset ID is a long unique alphanumeric code automatically assigned according to the following schema:
- CC-999999-XXXX-YYYY-ZZZZ
Where:
CC = COUNTRY CODE
9999999 = UNIQUE ACCOUNT NUMBER
XXXX = CUSTOMER ID
YYYY = LOCATION CODE FOR THIS CUSTOMER
ZZZZ = ASSET CODE AT THIS LOCATION
- CC-999999-XXXX-YYYY-ZZZZ
- LONGITUDE and LATITUDE is computed from the address entered and may actually be refined in the Map window to the right
- This fine-tuning is useful for large properties such as farms and industrial complexes where a single address is not adequateenough and may actually be quite far from the recorded street address
- In this step you will add the type of the asset you want to create and enter the details of the customer. Most of the details of the customer will populate automatically.
- Enter emails of the officials of your company who wish to receive exception and other alert notification emails concerning the asset.
- You can upload the image of the asset by clicking on the image tab.
- The map is showing the pinned location of the Asset. The longitude and latitude provide the refined location of the asset.Add image to populate asset information
- Click on the Set Scan Schedule button. You can set the timing of the scan and start and end time of the project. Set the tolerance time for your employee to scan. The scan time will send an email and a push notification on the device of the employee as a reminder.Add image to set scan schedule
- Click on Save and Add New to add next asset.
- Once you save the asset you will able to see the QR Code for the asset which will be scanned every time the project starts and end or in the middle depending on your scan schedule. You can also deactivate the schedule. The scan history show the No. of scans, Average scan, last scan date and time and next scan date and time. This will help you to keep track of your employee and the progress of the task assigned.Add image to deactivate schedule and History
- You can print ,as well as email the QR code to your employee or customer by clicking on Print or Email button at the bottom of QR code.
- Click on Save button to save the asset.